The route
The main loop is 110 km with 6.500 m of vertical gain. This route can be extended towards the west with one additional pass. There is also an option to shortcut the loop in the north/south direction.
Tipp: Open the side panel on the left and toggle the different routes.
- Download the whole map HERE
- Download my route HERE
- Add the map to Google Maps HERE
- Download the mentioned PoI’s HERE
The main loop
The start/end of the loop is in Ozgorush. It can also be exited towards Ak-Say, which will require a long road walk to get out. I would highly recommend walking the loop in a clockwise direction. This is the route I hiked. The others I’ve prepared as backup. This is mainly due to three reasons:
- Acclimation to the high passes
- Valley after the Uponym Pass
- Ascent of Ak Tubek Pass
Acclimation
The start of the loop is at 1400m, and the highest pass is at 4300m, which means if you’re not getting acclimated properly, you’re in for a bad time. Of course, you can wait a few days in front of the pass if you go anti-clockwise, but the route makes it easy to get properly acclimated if you go clockwise. All of our nights were on ~ 2600m, and then the last two nights before the pass on 2800m and 3700m; therefore, the altitude wasn’t a problem.
Uponym Pass
The section after the Uponym Pass towards the Camp of Day 2 is super tedious. At least it’s downhill in a clockwise direction. It’s a very narrow canyon with countless river crossings, little swampy areas, and very rocky sections. It’s a slow part where you have to be concentrated. It will be even more annoying not doing it clockwise.
Ak Tubek Pass
Doing it in a clockwise direction allows you to camp close to the pass. There are multiple suitable camp spots along the way, which isn’t the case from the other side. Furthermore, especially if you are going early in the season, as I did, there is significantly less snow on the ascent going clockwise and coming from the east as the trail hugs the south-facing side of the mountain.
The shortcut
This option allows you to cut the loop in half. Depending on the direction, it can not only save some time but also avoid the highest pass on the loop. Even though it circumvents the Ak Tubek Pass, the shortcut is still quite demanding. It includes two passes: the Aktash Pass [3700m] and Dzhalgychi Pass [3595m].
The west extension
I planned this route in case the weather is good, and I wanted to do some more hiking. Yikes – as you’ll read in the day-by-day breakdown, the weather wasn’t good. The extension is 33km long and includes one more pass, the Urym Pass [3720m].
Border Permit
If you plan to enter any areas that are part of the restricted border territories, you need a “Border Permit”. This can also be requested by yourself, but would I do it? No. You can easily get it via an agency. I have used 2 so far, and it worked perfectly. I have been checked by the military on both trips, so I would highly recommend getting it. It’s valid for 30 days, and it’s normally valid for all zones – but you can also get one only for specific areas.
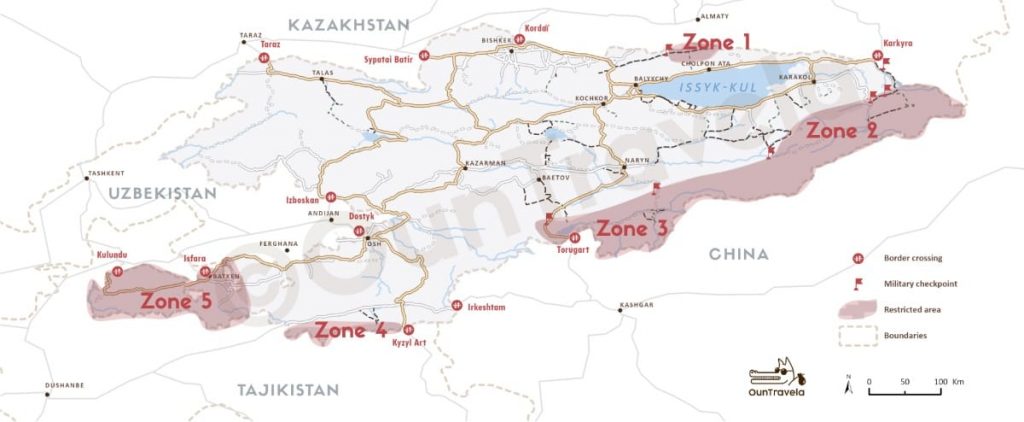
I have used those two companies as of now:
Both were professional and flawless. As OunTravela doesn’t offer delivery and only pickup in Bishkek, I went with Tours Too this time, and I got it delivered to Osh. I would also recommend making some copies of it.
You’ll need to register with the military in Katrang here – 39.838855, 69.983761. For me, the driver of the homestay did the communication, so I can’t provide further details. How this went down is described in the chapter on how to get there.
When to go?
Well, the main season is July/August. I went at the beginning of June, and I would say this is the earliest you can go. Would I recommend it? No. Mainly due to two reasons. The first was the overall weather – there was basically every day rain in the afternoon. This was also the case the week before and the week after. It’s still totally possible to hike – it’s just not as nice as in summer. Therefore, the nature is flourishing green. The main reason is the snow situation on the Ak Tubek Pass. I would highly recommend checking the latest satellite images, for example, via Copernicus. I encountered some easy snow fields on the ascent, but the descent was snowy and icy. As I went very light-weight, I didn’t bring microspikes or crampons [I went with trailrunner only anyway]. If you are experienced and you take your time to punch holes in the ice to walk, you can manage it, but techniques like self-arrest are absolutely mandatory. If you want to be on the safe side, the terrain would require at least microspikes if not crampons. So if you avoid all of this, just go in the main season.
How to get there
This description will start from Osh. You can either fly into Osh or take buses from all major cities.
There are three main options for getting from Osh to Ozgorush.
- Bus to Razzakov and jump off at the junction
- Bus to Batken and then another Bus from Batken to Ozgorush
- Private taxi
I went with option 1 on the way towards Ozgorush and with option 2 on the way back to Osh. Apparently, a private taxi one way would be around 100 USD.
The starting point in Osh is the new bus terminal located here: 40.562047, 72.770808. From. There, you either take a bus to Razzakov or Batken. I would always recommend going with option 1 as it’s way faster and more comfortable, and it minimizes the time on the bus.
So after taking the bus towards Razzakov, I jumped off the bus at the junction towards Ozgorush. There, I got picked up by a car from the guesthouse where I was going to stay the first night. I can highly recommend it – Gostinitsa Ozgorush. The driver also went past the military checkpoint, and I just needed to give him my permit, and he did the registration and passport with the military.
On the way back, I took the bus, which stops in front of the guesthouse and goes to Batken. It’s a very bumpy and slow ride. I would not recommend it. From Batken, you take another bus to Osh.
In hindsight, it would be better to get back to the main street. Hitchhike to Razzakov and then take a direct bus to Osh.
Day by day breakdown
In the following part, I’ll break down every day of hiking. I’ll only focus on the technical parts of the hike. This includes trail condition, river crossings, etc. But not landscape, scenery, or similar.
The place where I stayed can be seen by looking at the end point of the GPS file for the given day or in the PoI file.
I hiked everything with a trailrunner and a frameless backpack with a base weight of ~9kg, excluding 3.6 L water capacity and 10 days’ worth of food. The coldest night was 0° on 3700m. The hike started on 03.06.2026.
The nomenclature for the daily summary should be read as follows:
Day | KM hiked | elevation gain | active moving time | elapsed time
Day 1 | 14 km | 1450m | 4h 57m | 6h 36m
Easy trail from Ozgorush. It’s continuous uphill. There is plenty of water along the hike as you follow a river, and later on, there are some small creeks. There are plenty of campspots [I added them to OSM] along the route, except the steep uphill from km 7 to km 12. Except for some huts at km 11. I slept in an old hut as there was rain and thunder. Sufficient space for 2 people.
Day 2 | 16.8 km | 910m | 6h 14m | 10h 50m
Easy trail up to Uponym Pass. Here and there, you need to follow the GPS as it’s not visible. The last part of the pass is very steep. Plenty of water sources along the way. The hut here – 39.768989, 70.216074 can be only used as an emergency, as it’s very dirty. The area after the pass around the hut here – 39.77024, 70.251676, I can recommend for camping. The hut can also be used in an emergency. The section after that is nasty. Narrow canyon, swampy areas, steep stony paths, and no trail. It’s a very slow section. The valley opens up, and there are plenty of gorgeous camp spots.
Day 3 | 19.75 km | 686m | 5h 15m | 5h 58m
There is a new street you follow for 5 km. After that, you’re back on a nice hiking trail. As soon as you pass Курбака here – 39.756166, 70.332959. The trail is clearly visible and easy to follow. There are also bridges every time you cross the river. Therefore, there is also plenty of water. The campsite is great with plenty of space next to the ruins – with some even having a roof to provide shelter.
Day 4 | 18.26 km | 1789m | 6h 56m | 8h 07m
The trail is easy to follow until the river crossing. The bridge here – 39.667729, 70.30337 doesn’t exist. The river crossing can be tricky as it’s hard to get to the river and back on the trail. The river itself is knee deep for ~10m. There is supposed to be another bridge further up the river – I can’t verify. After that, it’s cross-country until the switchbacks start. The trail is clearly visible and easy up to the Кара-суу Pass at 3280m. The downhill is easy, and the second Kosh-Maimok Pass is also easy. The downhill continues being easy to follow. The campsite is great, and during the main season, there is, I think, a commercial camp. Water is available while being close to the rivers.
Day 5 | 8 km | 918m | 2h 54m | 3h 14m
Easy day and a nice trail at the beginning before it turns into cross country. Water is available at the rivers. The campsite is a bit exposed as there are no trees/stones. There are some more protected camps a bit earlier.
Day 6 | 13.27 km | 686m | 4h 37m | 6h 16m
The trail remains easy and non-technical. Some snowfields are found at elevations of the last 200 m. The pass was snow-covered. The downhill was nasty. An icy crust on the snow would have required microspikes or crampons. With Trailrunner, I resorted to making foot holes with my hiking poles. The first 400m downhill were icy, and then it turned into loose gravel. After that, it’s an easy trail. Water is available at the rivers. The campsite is maybe used by commercial companies during high season – other than that, great.
Day 7 | 19.72 km | 77m | 4h 02m | 4h 15m
Very easy final day. Trail is mostly cleary visible. You have to cross the river a few times but there is always a bridge.
Cheers – I hope this was a little help for your planning! 🙂
Leave a Reply